Real Browser Testing FAQs
Recording
I successfully recorded a testcase, but the replay had an error. What is wrong with the recorder?
Quite likely there is nothing wrong with the recorder. While the recorder is a great way to get a testcase started, it is not intended to yield a perfectly working testcase for most cases.
First, let us set your expectations correctly: The recorder is a very fast and convenient way to get a testcase started – 10x-100x faster than creating it from scratch. The recorder tries to make intelligent decisions about how to build a testcase to reflect the scenario. However, many testcases will not replay correctly without at least a small amount of customization.
Second, there are cases where it would be nearly impossible to create a correct testcase without a deeper understanding of the application scenario and the underlying code. As an example, imagine a page containing a table and you’ve clicked on a link in the first row. Did you click on that link because it was in the first row? Or because the link said “click me”? Or because some other image was present in another column of that row? Only the human tester can answer that question.
So to wrap this up – some customization of testcases is to be expected. Other sections in this manual will help you diagnose problems and suggest solutions.
Why is my login not recorded on OSX?
When Chrome auto-fills fields (login and others), it does not send a change notification for those fields. As a result, our recorder does not recognize an action on those fields and does not create a step in the testcase for them. On Windows, Chrome stores these saved settings in files that we are able to hide when launching Chrome for recording, so Chrome will not auto-fill them. The user is then forced to fill in these fields and Load Tester records them. Mildly inconvenient, but the testcase is generated correctly. On OSX, however, Chrome stores saved logins in a secure system storage that is not easily editable. We could remove logins from the system, but we could not restore them. I recommend clicking on each of those fields during the recording so that a step will be created for them. After the recording is complete, you may then edit the testcase, change the step type from click to type text and provide your credentials.
Why are mouse movements not recorded?
One of the more common testcase edits required to get testcases working is to add mouse move steps that enable, create or show elements on the page before they can be clicked. So why can’t Load Tester record these and save the tester the effort of inserting these steps?
We think that Load Tester could record mouse movements relatively easy, but we have chosen not to do that. Why? Because the resulting testcases would be littered with scores of mouse move steps – maybe hundreds in a testcase. The vast majority of those are not required for correct operation of the testcase and will have no effect on it. But they WILL make the testcase much harder to read and maintain. Many testcases will not need these at all, and for those that do, inserting a mouse move step is usually pretty easy. If you feel strongly that this is not the ideal solution, please contact us – we want to hear from you!
Replaying
Why do I get “Unable to locate element…” errors?
When testing with real browsers, locating the correct element to interact with is half of the battle. The recorder will choose a locator based on an analysis of the target element and the page during recording, but those locators may not be suitable. In addition, locators that are suitable at one time may become unsuitable as the application changes over time. Please refer to our article on locating elements.
Can I set a breakpoint in a testcase?
Yes, you can set a breakpoint on any step.
How can I tell which dataset values were used during a replay?
Starting in version 6.1, this information is included in the diagnostic logs that are captured by the virtual user when an error occurs. The logs are available when a replay fails:
 Click the HTML and logs link and then scroll down past the HTML source to find the diagnostic logs. The testcase execution log will contain lines like this:
00:06.762 Start step: Type Dataset userlist:username into element with ID = "user_login"
00:07.334 Resolved datasource: Dataset userlist:username = user1
The second line shows the value that the datasource (Dataset userlist:username) provided when the step was executed.
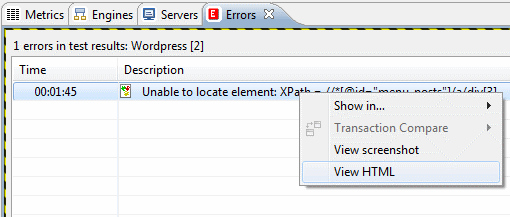
When investigating an error in a load test, the same information is available if there is an image icon next to the error (which indicates that a screenshot and logs were captured). You can access the HTML and logs from the context menu for the error:
Test Results
Why are some steps in the test report while others are not?
Load Tester attempts to automatically decide which steps should be in the report when it creates the steps during recording (based on the event type (click, etc) and the URLs of the pages). This saves testers from having to sift through hundreds of unimportant steps to find the important ones.
If step display/edit area at the top of the testcase editor shows a “measure this?” label for a step, then the step will not be measured. To turn on measurement for the step, press the “measure this?” label. It will say “not yet measured” until the next replay of the testcase and will be measured in future load tests (and included in the load test report).

