Load Testing Mobile Websites for Android
Load Testing a mobile website has a few key differences from testing the full desktop-oriented version of a website. In this article, I will review those differences and show you how to use Load Tester to create testcases using the stock browser on Android 4 / ICS (the Ice-Cream Sandwich release).
This article does not cover the entire load testing process – I recommend checking out our videos and tutorials for more information on using Load Tester to run and analyze load tests.
Before I jump in, I want to give a quick introduction on how a load test is created in Load Tester (and most other load-testing tools). If you have already used a record-and-replay load testing tool, feel free to skip the rest of this paragraph. A load test models one or more usage scenarios, which we call testcases, that will be executed by virtual users during a load test. Testcases are created by performing those actions during a recording session and then customizing the resulting testcase as necessary. When you start a recording, Load Tester changes the proxy settings for the browser and launches it. The browser will then use Load Tester as a proxy server during the recording – thus allowing Load Tester to capture all of the messages exchanged between your browser and the web server(s). This series of HTTP requests and responses is what we call a recording. A testcase is created, from the recording, that can be replayed by a virtual user to simulate the actions of a real user. During a load test, one or more testcases are executed simultaneously by many virtual users – thus placing realistic load on your system.
Recording a testcase
When recording with a desktop browser, Load Tester can automatically configure the browser’s proxy settings and launch it for you. But when dealing with mobile devices, this is not possible – as the device is either physically separate or is running inside an emulator which does not provide outside controls. But not to worry – the configuration for Android 4 is easy.
Step 1 – Configure Load Tester
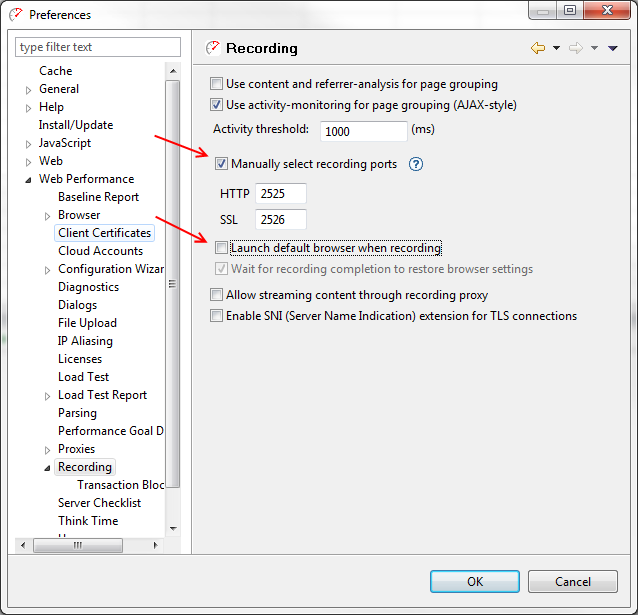
When recording from a phone or tablet, we need to make two changes to the recording settings in Load Tester. The settings are located in the Recording preferences page, which is accessed from the Window menu > Preferences, then expand the Web Performance node and select the Recording node.
- Turn on the Manually select recording ports option. Note the default ports, or change as needed to any open ports on your system. This will set the recorder ports to known ports (otherwise Load Tester may pick different ports when a recording is started).
- Turn off the Launch default browser when recording option – this will prevent launching the desktop browser during recording.
Step 2 – Configure Android 4 Phone / Tablet
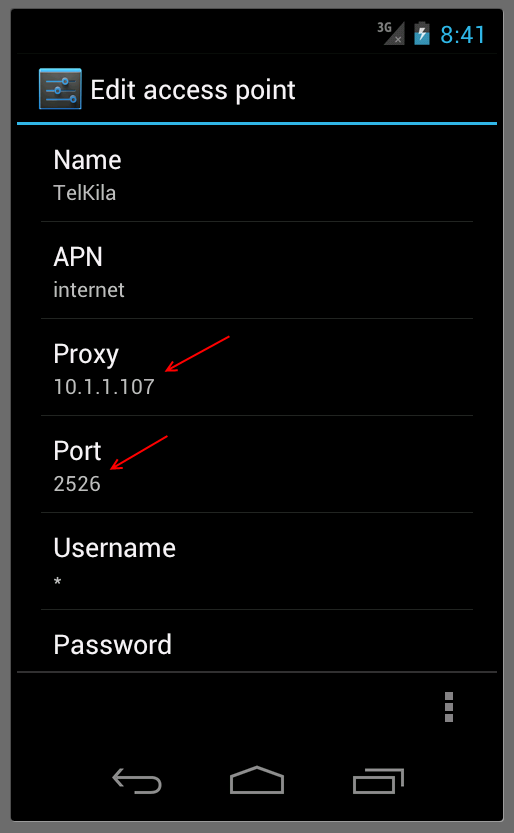
One of the welcome additions to Android 4 is the ability to set the proxy settings (in previous versions, this could not be changed without root access). Open the Settings application, then under Wireless & Networks choose More…, then Mobile Networks > Access Point Names > TelKila. That last one, TelKila, may be different on your phone – I’ve listed the settings as they appear in the Android 4 emulator in the Android SDK. Fill in the Proxy field with the IP address of the computer running Load Tester (see screenshot below). Do not use localhost, even if you are running in the emulator, as this will resolve to the Android device and the recording will fail. Next, fill in the Port field with the SSL port number configured for the recorder in the previous step (this port works for both HTTP and SSL traffic). After this change is made, all HTTP requests from the phone will be directed through the proxy – Load Tester’s recorder. If Load Tester is not running or not reachable, the browser will be unable to communicate, so be sure to change this setting back when the recording is complete if the Android device is to be used for other tasks.
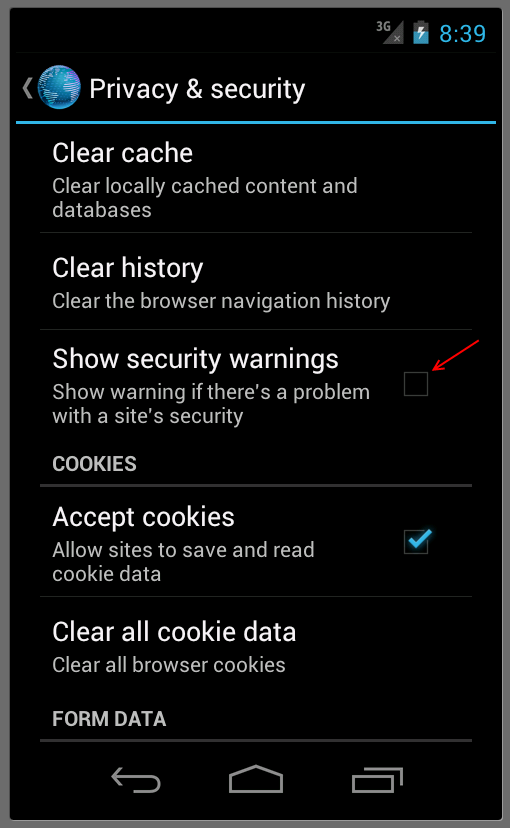
There is one more configuration change that we recommend if any SSL is in use – turn off security warnings. To do this, first open the Android browser and choose Settings from the menu. Go to Privacy and Security and turn off the Show security warnings option (see screenshot below). This will suppress the warnings the browser will show each time Load Tester presents it’s SSL certificate during the recording process – this is necessary for Load Tester to record and analyze the traffic on SSL connections. While not as serious, we also recommend reverting this setting before using the device for other purposes.
Record a Testcase
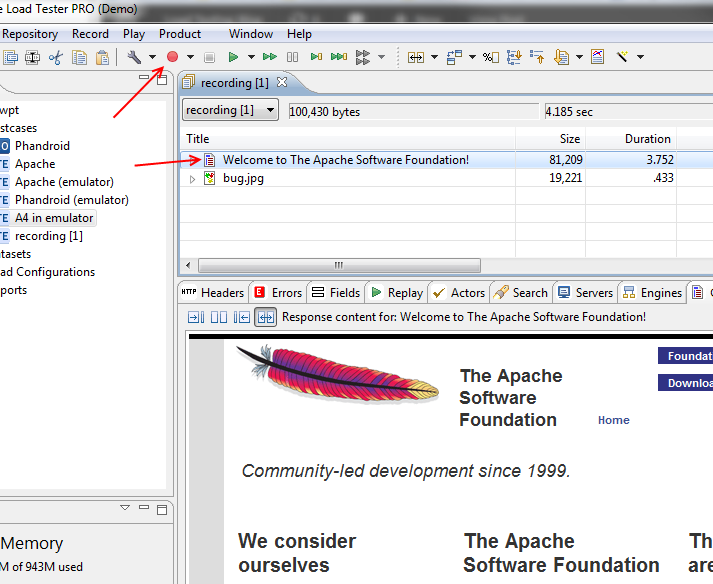
With those settings adjusted, you can start the recording. Return to Load Tester and press the Record button on the toolbar. It will open a new testcase editor which will be populated with pages and transactions as you browse the site.
Navigate to the first page of your site in the Android browser. Then return to Load Tester and confirm the page is listed in the testcase editor. If it does not, then the browser is not correctly configured to use Load Tester’s recorder as its proxy. Double-check the host and port settings. If they are correct, then raise an issue in our technical support system and we’ll help you get it working.
If you want to simulate new users (users coming to your site for the first time) then before you browse to the first page of the site, you must clear the browser cache. You can do this on the browser Privacy & Security page (see the screenshot earlier in this post).
Once you have confirmed the recording is working, continue browsing the site to complete the scenario you want to test. I recommend starting with the simplest possible testcase at first – preferably one with a few pages but without a login or any user input.
Run a load test
After creating a testcases, add it to a load configuration (by choosing New Load Configuration from the pop-up menu for the testcase in the Navigator view) and run quick load test to get a feel for the entire process. This 30-minute Introduction video will give you a good overview. After completing a basic load test, you can move on to more complex testcases – these tutorials on Unique User Identities and Customizing User Input will help get you going.
Chris Merrill, Chief Engineer


2 Comments
27 August 2012 360logica
When I am using my android, it looks like I know the entire procedure how this app is working and process flow is going on. Thanks for sharing this useful information with us. Please continue to post more updates on testing.
360logica
2 January 2013 testingwhiz
Load testing mobile websites for Android are quite different from the desktop websites. So thanks for guiding.