Load Testing by Example
How to Load Test SugarCRM
Overview
This tutorial demonstrates the steps for a typical load testing project using the SugarCRM application as an example. The majority of this article is applicable to load testing most web-based applications.Before continuing, I strongly recommend reading our Best Practices tutorial. It describes much of the methodology we follow during our load testing projects.
Prerequesites: This guide assumes a basic understanding of the Load Tester product. The Load Tester videos are a good introduction to the main features. You should be able to record testcases and be familiar with the Load Tester GUI. This tutorial will reference other tutorials as needed for topic-specific instructions. Reviewing some of our other tutorials, such as Load Testing 101: ASP .Net Applications and AJAX Load Testing may also be helpful.
Scope of this test
Like any CRM system, SugarCRM is a complex application with many possible use cases. Since this is only an introduction, only a small number of scenarios will be tested - enough to illustrate the techniques required to perform an effective load test.Database population
An integral part of most load testing efforts includes populating the applications database with data required for the tests. For example, any scenario that includes a user login must be pre-populated with users. A scenario that involves searching a product database requires that there be products in the system. If the application has web interfaces for these operations, Load Tester can help in that process. These procedures will be demonstrated as part of this tutorial.It is also important to note that system performance is frequently related to the size of the database. Testing a system that is populated with data in magnitude that is close to the expected deployment will yeild more accurate test results.
This example is geared towards a larger CRM installation - the database will be pre-populated with 1000 users and 10,000 accounts and contacts in preparation for the load test. The instructions provided here are easily customized for testing smaller quantities of data.
Test steps
- Create, configure and test a testcase for one scenario
- Run a load test using the testcase to measure the performance of the testcase in isolation
- Use the testcase to populate the database and save a backup
- Repeat steps 1-3 for each scenario
- Create a load configuration for all the scenarios and run the final test
Configuration Management
Please refer to the Configuration Management section of our Best Practices guide for some general advice on this topic.Besides using dedicated machines in our test lab, we will manage the database using some simple MySQL commands to save and restore various configurations, shown below. We will use this feature frequently to ensure that testcases are always run against a known database state.
To backup the database:
- mysqldump sugarcrm > filename
- mysqladmin drop sugarcrm
- mysqladmin create sugarcrm
- mysql sugarcrm < filename
Scenario Selection
Please refer to the Scenario Selection section of our Best Practices guide for some general advice on this topic.For this project, these scenarios will be tested:
- Add a new user
- Add a new account
- Add a new contact
- Add a note to a contact
- View a note for a contact
Scenario 1 - Add a new user
Please refer to the Testcase Construction section of our Best Practices guide for some general advice on testcase construction.This scenario consists of the administrator logging into the system, creating a new user and logging out. The resulting testcase will be used to populate the system with users for the other testcases, but will not be run during the load test.
Scenario Steps:
- Navigate to SugarCRM homepage
- Enter username and password then press the Login button
- Select Admin
- Select Create User
- Enter first name, last name, username, password and turn off the first-login timezone prompt
- Select Save
- Select Logout
Step 1 - Record the Testcase
Next, record the testcase. After recording, restore the database. Replay the testcase. Load Tester will prompt you to perform pre-replay configuration - allow the wizard to use its default settings. After configuration, the replay will succesfully repeat the scenario, adding the same user that was added during the recording. If you did not restore the database between recording and replay, the replay will encounter an error because the user already exists in the system. As a result, SugarCRM will return a different page than was expected after the save button is simulated. This will cause some of the automatic validation to fail and generate an error.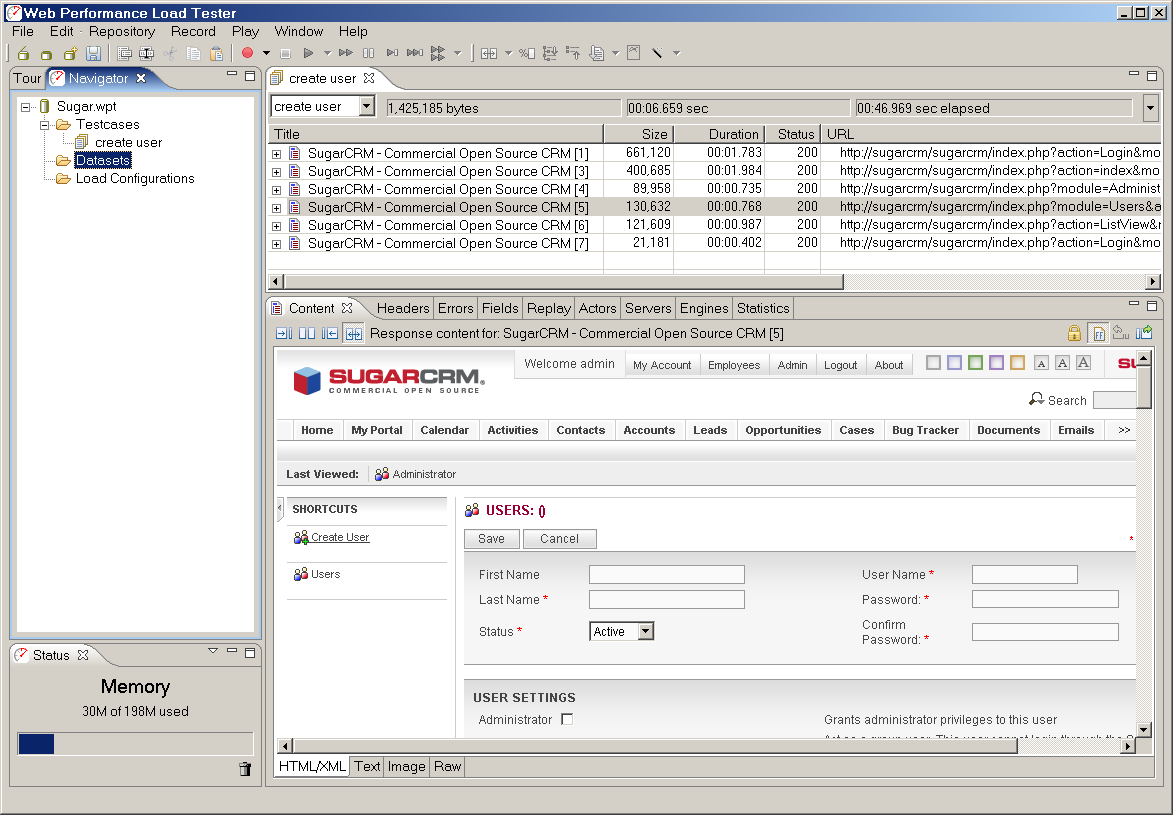
Step 2 - Customize user input
During the replay, we do not want to create the same user over and over. During the load test, this would generate errors since two users cannot be created with the same username. Additionally, in preparation for the load test, we want to use this testcase to populate the application with multiple user identities that can be used during the load test. So the testcase needs to add different user each time it runs -- it needs to simulate the administrator entering a different input into the username, password, first name and last name fields for each of the 1000 users we want to create.The first step is to create a dataset containing the required fields and 1000 rows - to create 1000 users. Detailed instructions for this task can be found in the Creating a Dataset tutorial. The result should look something like this:
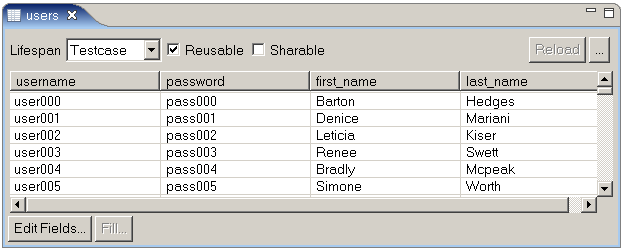
After creating the dataset, the next step is to configure the relevant fields to use values from the dataset during a replay, instead of the recorded value. A detailed description of this process can be found in the Customizing User Input tutorial. The example provided in that tutorial is based on the same testcase - adding a new user in SugarCRM.
After making the changes for the 5 fields (there are 2 password fields), the testcase may be replayed. The first replay will create a user based on the first row in the dataset. Replaying several more times will use subsequent rows of the dataset and create a new user corresponding to each row.
Step 3 - Populate the database with users
After testing the replays and confirming that the new users are created, restore the database (to remove the created users). Next we will use Load Tester to populate the system with users for the load tests. Technically, we will be running a load test, but in this case we don't really care about measuring the performance. Since having lots of administrators rapidly creating new users is not an expected use case of the system, we want run just enough users to use the full capacity of the server, but not enough to overload it and cause errors.We want to run this testcase 1000 times - once for each user identity in the dataset. In Load Tester, we must first create a load configuration containing the testcase (use the Load Test button in the product tour or select New Load Configuration... from the pop-up menu for the testcase in the Navigator). The number of users that your sustem can sustain while running this testcase will vary based on hardware, etc. On our system, we peaked at less than 40 users running at cable modem network speeds. So we configured the test to start with 40 users and not add any additional users. We also set it to run until 1000 repeats of the testcase have completed, rather than a fixed duration test.
This operation can take several hours, depending on the hardware and software configuration. After the full population run is complete, verify the results by logging into the system as some of the users to ensure the users were created successfully (including the last one!). When satisfied that all the users have been created, back up the database and label it created users.
Scenario 2 - Add Account
This scenario consists of logging into SugarCRM, creating a new account and logging out. The scenario will be used to populate the system with 10,000 accounts in preparation for the load tests and will also be run during the load test.Scenario Steps:
- Navigate to SugarCRM homepage
- Enter username and password then press the Login button
- Select Create Account
- Enter account name
- Select Save
- Select Logout
Step 1 - Enter unique account names
The first configuration step will allow the testcase to be replayed multiple times. As it stands, the testcase will generate an error on the second replay because the account name, as entered during the replay, will already exist when the second replay attempts to create the account. The application will not allow multiple accounts with the same name...so the testcase will fail. A list of account names to create in the system will be required to provide the values for the account name field. In Load Tester, create a dataset named Accounts with a single field named name. Next, populate it with 10000 account names. The dataset should use the testcase lifespan and be non-reusable.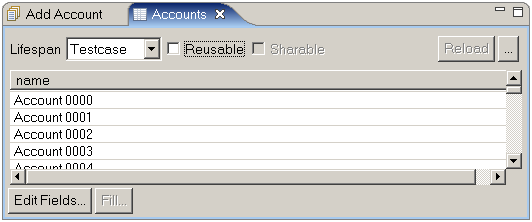
With the dataset ready, we can now customize the testcase to use account names from the dataset instead of the recorded name when the testcase is replayed. Locate the name field and configure it to use the name field in the Accounts dataset. For more details on this operation, consult the Customizing User Input tutorial.
Step 2 - Customize dynamic field handling
One more customization is required for this testcase to be simulated properly - the module and action fields must be configured as constant fields. SugarCRM uses these fields on most links and forms as part of the internal framework. In some cases, depending on the nature of the testcase and the user state, Load Tester will not choose the correct dynamic values for these fields. For SugarCRM, the easiest solution is to treat these fields as constants. The Overriding ASM tutorial demonstrates how to ignore these fields permanently for all testcases.Now replaying the testcase multiple times will result in the creation of new accounts using names from the Accounts dataset.
Step 3 - Simulate unique users
Next, we would like the testcase to simulate multiple different users performing this operation. We could follow the approach used above: locate the fields in the Fields view. Alternatively, we can use the User Identity wizard, enter the username and password that were entered during the recording and Load Tester will locate and configure the fields automatically. The User Identity tutorial demonstrates this approach. Using either approach, configure the testcase to login using the user identities that we created in the Add a new user scenario.Once the user identity configuration is complete, restore the database from the created users backups. Running multiple replays should now simulate multiple users logging in and creating accounts with different names.
Step 4 - Populate the database
Restore the database from the created users backups. Create a load configuration using this testcase and set it to run 40 users (or whatever is appropriate for your hardware) until all 10,000 accounts are created. After running the load test and verifying the results, backup the database and label it created users and accounts.Scenario 3 - Add Contact
This scenario consists of logging into SugarCRM, creating a new contact and logging out. The scenario will be used to populate the system with 10,000 contacts in preparation for the load tests and will also be run during the load test.Scenario Steps:
- Navigate to SugarCRM homepage
- Enter username and password then press the Login button
- Select Create Contact
- Enter names in First Name and Last Name fields
- Press the Select button for the Account Name field
- In the Account Search popup, enter an account name, press the Search button and select the first account
- Press Save button
- Press Logout button
Step 1 - Testcase configuration
The initial configuration steps for this testcase are similar to the tasks performed for the previous steps:- Configure the user identities to use the Users dataset
- Generate a Contacts dataset containing 3 fields: firstname, lastname and account_name. The account_name field should contain the account name that the contact will be associated with - it must match an account name exists in the system - for example, one created by the Add Account testcase. The dataset should use the testcase lifespan and be non-reusable.
- Configure the first_name and last_name fields to use values from the firstname and lastname fields of the Contacts dataset.
- Configure the name and account_name fields to also use a value from the account_name field of the Contacts dataset. This corresponds to the account name entered on the Account Search popup and the automatically-populated field in the new contact form.
Step 2 - Configuring the AJAX callback
After these steps are completed, the testcase will replay as desired with one exception -- the contact will be associated with the originally recorded account. The account selection pop-up uses an AJAX callback that requires special treatment. The Handling AJAX callbacks with a custom detection rule tutorial will guide you through the required steps.After completing the configuration for the AJAX callback, restore the database from the created users and accounts backup. Replaying the testcase multiple times will now create multiple contacts associated with the accounts specified in the Contacts dataset.
Step 3 - Populate the database
After restoring the database from the created users and accounts backup, a load test can be configured to fully populate the database with the contacts in the Contacts dataset. In our case we now have a database with 1000 users, 10,000 accounts and 10,000 contacts. Backup the database and label it created users, accounts and contacts.Scenario 4 - Add Note
This scenario consists of logging into SugarCRM, locating an existing contact, adding a new note to the contact and logging out. The scenario will be used to populate the system with 10,000 notes in preparation for the load tests and will also be run during the load test.Scenario Steps:
- Navigate to SugarCRM homepage
- Enter username and password then press the Login button
- Select Contacts
- Enter a name in the Last Name field
- Press the Search button
- Select the contact
- In the History section, select Create Note or Attachment
- Enter a subject and note
- Press Save button
- Press Logout button
Step 1 - Testcase configuration
After the previous testcases, this one is relatively simple to configure:- Use the Testcase Configuration wizard to apply the default configurations, except for user identity. For user identity, configure the testcase to use the username/passwords from the Users dataset.
- Using the Fields view, configure the last_name_basic field to use values from the lname column of the Contacts dataset.
- Apply the same treatment to the name and description fields, which correspond to the "Subject" and "Note" fields from the Add note operation. You will need to generate a new dataset (Notes) containing subject and note fields.
Step 2 - Configure first_name_basic field
The new task for this testcase is to configure the first_name_basic field to always submit a blank value. The default configuration applied by Load Tester will automatically use the value that appears in this field when the page is received from the server. SugarCRM automatically fills the first name and last name fields in the search form with the names of the contact that was viewed most recently. Since we only want to search by last name, the first name field should always be blank. Making this happen is nearly identical to configuring the field to use a value from a dataset. Edit the first_name_basic field (from the Fields view) and select the Constant option.After completing the above configuration, replay the testcase a few times and verify the notes were added to the database.
Step 3 - Populate the database
Restore the database from the created users, accounts and contacts backup. Then create and run a load configuration to add all the notes in your dataset to the system. We added one note for each of the 10,000 contacts. After verifying that all the notes added to the system, backup the database and label it created users, accounts, contacts and notes. This version of the database will be used for load testing.Scenario 5 - View Note
This scenario consists of logging into SugarCRM, locating an existing contact, viewing a note for the contact and logging out. This scenario will be run during the load test.Scenario Steps:
- Navigate to SugarCRM homepage
- Enter username and password then press the Login button
- Select Contacts
- Enter a name in the Last Name field
- Press the Search button
- Select the contact
- In the History section, select the first note
- Read the note
- Select Logout
Step 1 - Testcase configuration
This scenario is the easiest to configure- Use the Testcase Configuration wizard to apply the default configurations, except for user identity. For user identity, configure the testcase to use the username/passwords from the Users dataset.
- Using the Fields view, configure the last_name_basic field to use values from the lname column of the Contacts dataset.
- Configure the first_name_basic field to be blank, as described in the previous testcase.
This would be a good point to backup the Load Tester repository and save it somewhere safe, along with the most recent database backup.
Load Test Configuration
Thus far, we have:- established system backup/restore procedures
- configured and tested 5 testcases
- created datasets
- populated the database for a load test.
New datasets for the test
Two of the the datasets we have created (Accounts and Contacts) are not re-usable within the original scenarios. Neither accounts or contacts can be duplicated -- once they have been used in the Add Account or Add Contact scenarios, they cannot be used within that scenario again. While the Notes scenario does allow duplicates, it can be handy to be able to check the system after a load test to verify that the expected notes were added to the system.Create new datasets
The copies of following datasets need to be created - with new names. Each new dataset should have the same field names as the old dataset, but with new data values.- Accounts
- Contacts
- Notes
Re-configure old datasets
After cloning the datasets, the old sets, which will still be used in the load tests, can be configured as reusable (instead of non-reusable). The old sets will be used for providing existing data, not new data - so it can be safely re-used multiple times.Configure testcases for new datasets
Next, the testcases need to be configured to use the new datasets. This changes only need to be applied where the dataset is used to create new entries in the system. Any testcase that is querying existing data should continue to use the old datasets. For example all the testcases should continue to use the Users dataset to supply user identities.The following fields must be changed to use the new datasets:
- Add Account scenario - name field
- Add Contact scenario - first_name, last_name, name and account_name fields
- Add Note scenario - description and name fields (corresponding to the note body and subject)
Testcase looping options
All of our testcases follow a pattern of steps:- login
- do something
- logout
- login
- perform task X or task Y or task Z
- repeat step 2 N times
- logout
In an ideal world (that is, one with unlimited manpower and no deadlines), we would develop complex testcases that modeled this behavior very precisely, complete with randomized decisions of what task to perform next. Unfortunately, these testcases are difficutly to develop, debug and maintain. Fortuntely, most applications will display the same performance characteristics when tested with 3 simpler testcases like:
- login
- perform task X, N times (or task Y or Z - one for each testcase)
- logout
To configure testcase looping, select Properties from the Edit menu or Navigator pop-up menu for the testcase. On the Restart Options tab, select the starting and ending pages. The configuration is inclusive, which means both the start and end pages will be performed by the virtual user. The Restart User State option should be turned off. Turning on this feature would clear the user state, including cookies and other user state variables, when the end of the loop is reached. There are a few cases where turning this option on is required, but if the pages at the begining of the testcase include a login, I recommend turning this off.
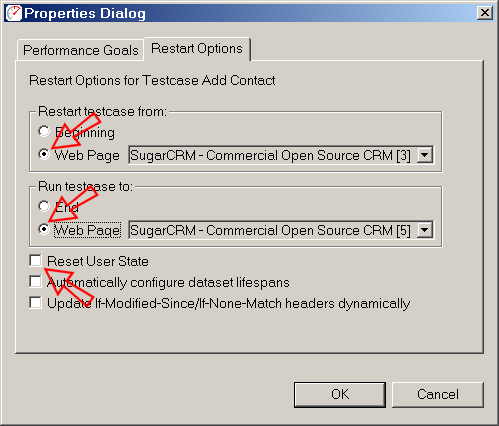
In the above example, we have configured the Add Account testcase to repeat between two pages - starting at the users home page and ending after the user has finished creating a new contact. This technique can be applied to all four of the testcases we will include in The Big Test.
Test each testcase individually
Before running The Big Test, it is wise to test each testcase individually. A common mistake by beginners is to jump right into The Big Test without any knowledge of the performance of each testcase. Running some smaller tests first has several advantages:- When a testcase performs badly by itself, the developers and administrators have a smaller number of possibilities to investigate - which makes it easier to find and fix the problem
- When the performance of each testcase in isolation is known, the results of The Big Test will be easier to analyze. If one testcase performs much worse than expected, it may indicate that some part of that testcase is conflicting with another testcase.
Think Time
Think time is the time between pages. This is the time the user spends reading the page, filling in form fields, scrolling up and down, looking for what to do next, etc. This is an important test parameter. It can greatly influence the test results. Testers tend to under-estimate the think time because, during the recording, they are focused on getting through the testcase correctly, not mimicing the behavior of a real user. I have many times seen tests that exhibited suprisingly poor system capacity results when, due to grossly underestimated think times, the test was actually simulating a transaction rate that was 100 or 1000 times greater than the expected rate for the number of simulated users.User ramping
Another common mistakes we see from load-testing newbies is ramping too quickly. There is a desire to jump quickly to the desired number of users and then run for a long time to see what happens - for instance start with 100 users and run for an hour. In our experience, this is not the most effective approach. The first problem is that the test results will only give you information about system performance when 100 users are running. If performance is poor, it does not tell you how many users the system was handling when the performance started to degrade. If performance is good, it gives no indication of any performance limits that the system might have been approaching. Many testers expect the system performance to change significantly over a multiple-hour steady-state test (sometimes called a soak test). This kind of performance was not uncommon many years ago, but with the higher-level languages such as Java, C# and scripting languages that are in common use today, these problems have been largely eliminated - mostly thanks to robust application servers, garbage collection and well-tested resource pool implementations.A more valuable approach is a ramp and hold. For example, ramp up by 10 users and then run for 5 minutes in each step. Each increment should last long enough to ensure that every operation was performed by every simulated user during the period. This helps to ensure accurate results by guaranteeing good coverage of the testcases. But most importantly, when performance does not meet expectations, it gives an immediate indication of how far away the system is from the intended performance goal.
This ramp cycle and the length of the testcases should drive the length of the test. In our examples, most of the testcases, as recorded, took, roughly 1 minute to complete. Our rule of thumb is increase that time by 20-30% (rounded up to the nearest minute) and use it as the steady-state interval. If our expected user load is 100 users, we might start with these load configuration parameters:
- Start with 10 users
- Add 10 users every 3 minutes (2-minute steady state plus 1 minute ramp)
- Test duration 32 minutes (3 minutes per ramp, plus a few extra at the end)
- Limit test to 100 users
Configure and run a test for each testcase and examine the results - see the analysis section below for hints on load test analysis.
The Big Test
By now you have created several load configurations. But this will be the first time we will add multiple testcases to the equation. The load configuration defines the mix of testcases that will run during the test as well as the duration of the test, the number of users, the rate at which additional users are added during the test, simulated network speeds, etc.The load configuration editor looks like this:
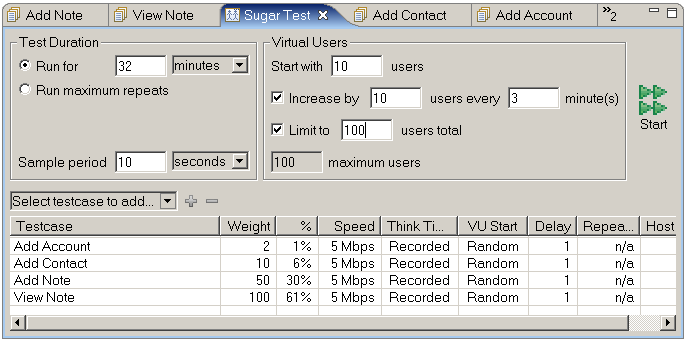
In this example, we have added all 4 testcases to the load configuration. Each one will use the recorded think times and simulate a 5Mbps network connection (per simulated user). You will note the weight and % columns - I have configure them to our expected user ratios. This will be different for every project. Having a mix that is at least close to your expected deployment is very important.
You can also see that we have configured the test duration and user ramping parameters as discussed in the above section.
Server Monitoring
Without some knowledge of what is happening on the server, diagnosing performance problems can be difficult. There are numerous tools for monitoring system performance. You can run a native, standalone monitoring tool, such as perfmon on Windows, and analyze the data separately. Load Tester offers two monitoring solutions. The product includes remote monitoring of CPU and memory utilization via the Windows Performance Counters APIs or via HTTP on Java-based application servers. It is extensible so that it can monitor any server via HTTP. The Advanced Server Analysis module adds a robust server-side monitor that takes ~20 performance measurements, depending on the OS. These include detailed metrics about processor, memory disk and network performance and provides robust fail-over support to prevent data loss when a server becomes overloaded. When using the Load Tester server monitoring agent, the results are integrated into the Load Test Report for easy analysis.Load Test Execution
In comparison to the configuration work, running the load test is easy:- Restore database to the correct starting point
- Ensure server monitors are ready
- Push the start button
When a test reaches the scheduled end time (or is stopped early), Load Tester will allow each virtual user to finish the current testcase. This is desirable in many cases, but is not required. The Halt button in the Status view allows the virtual users to be terminated immediately.
Analysis
Load Tester provides two primary sources of data about a load test. The Statistics view provides a detailed view of the metrics collected during the load test for each testcase, page and transaction. The Load Test Report summarizes this data and provides more advanced analysis. The report includes much of the raw data in more convenient tables augmented with numerous charts. Several advanced analysis sections, such as User Capacity and Peak Page Duration, help to make sense out of the mountain of data that is available. The reports are customizable, printable and exportable so that sharing the results with management and developers is easy.For an example analysis, see the companion performance report: Impact of APC Module on PHP Performance.
Feedback & Comments
Comments about this report may be posted at the company blog post.
About
Christopher L Merrill
©2007 Web Performance, Inc.; v1.1
Version History
v1.0 - 1st public release (12 September 2007)
v1.1 - email cleanup (23 Jan 09)